Showing posts with label main dishes. Show all posts

Wednesday, March 9, 2011

Sweet Potato and Kale Frittata


When I originally introduced myself, I promised cooking fiascoes. I'm happy to report that I have no had any major disasters since I started this blog. Until I tried to make a frittata.


Why was I trying to make one? Well, I bought kale for the first time over the weekend. The beautiful little bouquet of organic, purple-tinted leaves has been sitting in the bottom of my fridge for three days, crying out for love while I steadfastly ignored it.


So I did what any sane person would do. I Googled. And apparently, frittatas and kale are soul mates whose destinies were written in the stars...


Ahem.


The problem came from the pan I was using. It isn't oven proof. "No problem," I thought optimistically. "I will just flip it like a big omelete!" Forgetting, of course, that I am incapable of flipping a simple 2-egg omelete on a good day.


When flipping failed, I tried cooking it covered on low to get the middle and top done. Still failed. I ended up with a burnt bottom and runny top. In the end, I flipped the monster onto a greased cookie sheet and finished it off in the oven. Not as pretty, but it got the job done.


I am posting the recipe and instructions anyway, because the frittata itself actually tasted extremely good! (According to Keith it "tastes amazing with a shit-ton of ketchup," but you can ignore him. That's what I do.)


Sweet Potato and Kale Frittata
(inspired by Eggs on Sunday)


Olive oil
2 red potatoes
1/2 of a sweet potato
1/2 of a large yellow onion
2 cups chopped kale stalks removed
1 cups sliced baby bella mushrooms
3 cloves garlic
1 tsp thyme (or other dried herb)
1/4 cup parmesan cheese
Salt and pepper to taste


Generously coat the bottom of a large oven-proof pan with olive oil and set on medium heat. When heated, add sweet and red potatoes, and onions. Add mushrooms and garlic after 10-15 more minutes (before potatoes get too soft). Cook until the mushrooms start to brown, add the kale and cook until it wilts. At this point the potatoes should be soft, but not mushy. Cook longer if needed.


While you are cooking the vegetables, mix 8 eggs in a separate bowl. Whisk vigorously so that the eggs are light and fluffy.


Season the vegetable mixture with salt, pepper, and thyme. Sample your veggie of choice. Adjust seasonings as needed. When you are satisfied, add the eggs straight into the skillet. Use a spatula to flatten the top layer (it helps if you have an even layer in the pan before pouring the eggs in). Preheat your oven's broiler setting.


Cook the eggs until the edges and bottom are set (the top will still be runny). Sprinkle with parmesan cheese and place in the oven directly under the broiler. Take the pan out when the top is just beginning to brown and the eggs are done.




Monday, February 28, 2011

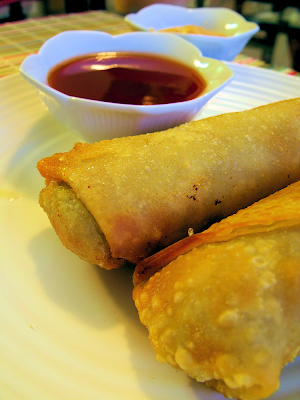
Restaurant-Style Egg Rolls (And How to Roll Them)


I don't think that I am exaggerating when I say that I learned a couple of important life lessons when making these AMAZING egg rolls from Babble.com.


These lessons are as follows:


1 - Egg rolls are not intimidating. They are seriously simple to make.


2 - Having to roll tissue paper around glass vials at work is a skill that apparently pays off in spades when it comes to egg rolls.


3 - If you have never tried cooking with fresh ginger (I hadn't before this), do it. Now. Just so you have an excuse to smell it. Ginger smells so fresh and tangy, it almost reminds me of lemon. I am ashamed of myself for ignoring it in all of those smoothie recipes I have tried over the past few years. Plus, I can't have lemon, so ginger has earned bonus points with me!


4 - Get a helper when you make these. Throw a party even. It's more fun and takes less time!


Also, there are apparently there are no illustrated / photographic egg roll rolling guides online. At least not that I could find. So I made one. :) I've got you covered on this egg roll business.


Restaurant-Style Egg Rolls
(original recipe found here)

1 lb ground pork, beef, or turkey (I used turkey)
4 cups finely shredded cabbage
2 cups matchstick cut carrots
1 – 8 oz package bean sprouts
6 green onions, chopped
1 clove garlic, chopped fine
2 tablespoons freshly chopped cilantro
1 teaspoon freshly grated ginger
1 tablespoon oyster sauce
1 tablespoon Hoisin sauce
20 egg roll wrappers
olive oil

flour and water for rolling egg rolls
vegetable oil for frying


Pull out your egg rolls and set aside. This is so that they can warm up to room temperature. They roll better that way.


In a large frying pan (or a soup pot if you are like me and only have one large skillet, and need it for frying later), pour in olive oil and brown the ground meat. Add carrots, cabbage, sprouts, onion, and garlic and cook until the cabbage starts to soften (about 10 minutes). Add ginger, cilantro, Hoisin sauce, and oyster sauce and cook until cabbage has completely softened.


Transfer to a large bowl and spread out to cool. The fanning technique used for sushi rice really helps if you want it to cool faster!


To make egg rolls, first dust a egg roll wrapper very lightly with flour on both sides. This is important and do not try to skip it! I see you trying to cut corners over there... I know it is time consuming, but this keeps the egg rolls from becoming overly wet, getting sticky, and /or breaking open. Trust me. I am talking from experience.


Follow the following steps:


1 - Put your lightly dusted egg roll wrapper on a plate. Fill with approximately 2 tbsp of cooled filling. Place the filling just slightly below the middle of the wrapper as pictured.


2 - Roll the bottom up. I found it helpful to lightly wet the bottom corner with just a dab of water, and to stick it to the wrapper while using my other hand to form the round shape of the egg roll. Don't worry about the ends on this step.


3 - Stuff any fallen filling back into the ends of the egg roll. Lightly wet the two outside corners. Pull one in and tightly it fold on top of the egg roll, sticking the corner to the wrapper. Do the same with the second side. Your egg roll should now resemble an open envelope.


4 - Roll the egg roll from the bottom up, stopping when the last bit of the top flap is left exposed. Make sure to roll tightly.


5 - Wet the entire two sides left exposed, in order to ensure a tight seal. Don't want these popping open in the skillet!


6- Roll it up and press lightly to seal! You're done. :) Wasn't that easy?


Preheat a large skillet or deep fryer filled with oil to approximately 350°F (180°C). If using a skillet, you can tell that the water is hot if you take a small about of room temperature water and flick it onto the oil. The oil should pop and sizzle when ready. (My skillet was only around 275°F (135° C) and these fried brilliantly!) Put a few egg rolls in the oil and cook for approximately 2 minutes per side. This will vary depending on your cooking method and oil temperature.


If any of your egg rolls get holes and filling starts to fall out, pull a bit of the surrounding dough to try and cover as much of the hole as possible (without making it worse elsewhere). Put that side of the egg roll in first. This should seal it back up!


Turn often with metal tongs so that all sides get cooked, and the bottom doesn't stick. Take them out when they are golden brown and crispy. Press with paper towels to drain off the oil.


Serve with a variety of sauces, or a side of fried rice. My favorite sauces are hot mustard and sweet and sour sauce!


Saturday, February 26, 2011

Roasted Red Pepper Pizza Sauce


Roasted Red Pepper Pizza Sauce
(adapted from Vegetarian Times)


1 cup jarred roasted red peppers, drained
(OR use 2 fresh red peppers, cut in half and roasted on a grill)
6 oil-packed sun-dried tomatoes, drained (retain 1 tbsp of oil)
1 clove garlic, finely chopped
1 teaspoon dried oregano
1 teaspoon dried basil
1/4 teaspoon freshly ground black pepper
1 tablespoon water


In a food processor or blender, puree red peppers, tomatoes, oil, garlic, and water. Add more water by the teaspoon until you reach your desired sauce thickness. Add in oregano, basil, and black pepper; blend until well-mixed. Makes about 2 cups.


Use for homemade pizza! I used a pre-made crust here. I plan on posting a pizza dough recipe someday.


Wednesday, February 16, 2011

Spiced Shredded Beef Sandwiches


I am in love with my crock-pot.


It was purchased months ago and sat in the back of my cupboard, forgotten, until winter came along. Now? It is out at least once every two weeks, producing stews, chilis, and pot roast.


I can comfortably admit that meat and I do not mix well. I always seem to have made it too dry, overspiced, undercooked, burnt, or half-frozen. Not that I mind. Give me a fresh summer veggie pasta dish over a grilled steak any day.


Needless to say, the crock-pot saved Keith from a life of meatless meals.


Spiced Shredded Beef Sandwiches

(inspired by Family Circle magazine)

1 cup beef broth (low sodium)
1 jar (8 oz) hoisin sauce
1/4 cup white vinegar
2 teaspoons Chinese five-spice powder
2 teaspoons garlic powder
2 teaspoons chili powder (optional)
2 ribs celery
2 large carrots
1 thin-cut beef brisket or chuck roast (2 lbs)
1/4 teaspoon salt
1/2 teaspoon black pepper
1 head bok choy


Whisk beef broth, hoisin sauce, vinegar, five-spice powder, and garlic powder with 1/2 cup water in a small bowl. Add optional chili powder for a bit of extra kick - Keith and I both thought that this recipe could have used a bit more flavor.


Cut the carrots and celery into 2 inch long matchsticks, and line the bottom of the crock-pot with them. Add the beef brisket/roast - cut in half if you need to make it fit better. Do not cut it in more than two pieces, or you will be angry with yourself when you are fishing them out later.


Season the meat with salt and pepper and pour the beef broth sauce over the top of everything.


Cover and cook on low for 10 hours or high for 5. Always choose the low setting if at all possible - it makes the meat softer and more flavorful.


Walk away and enjoy your next 10 hours of freedom!


When the time is up, remove the meat and allow it to sit and cool on a plate or cutting board. Skim any fat off the top of the beef sauce and throw it out.


While the meat is cooling, slice up the bok choy into small, thin strips. Add the entire head to the crock-pot, cover, and cook on high for 10 minutes.


Shred the beef up with two forks while you wait for the rest of the mix to cook. Cut any long pieces up into bite-sized chunks. Scoop the meat back into the crock-pot and stir to mix everything back together. Cook for 5 more minutes.


Serve on buns, with a side of salad!


(I suggest small buns with small scoops for those watching calories. The magazine article claims that 1 serving has 479 calories - keeping in mind that they say this is only 8 servings.)