Showing posts with label appetizers. Show all posts

Monday, March 21, 2011

Whole Wheat Pita Bread


Here is the recipe for home-made pitas I made with my hummus. These taste so much better than store-bought that it is unfair to even compare the two!


A word of advice: If you find yourself thinking, "I should clean my oven today.... Nah, I want to make pita bread."


Retract that. Clean your oven. Make pita bread another day. Because when you heat your oven to 500 F, it tends to burn the things on the bottom of your oven and you set off your smoke detectors. Multiple times. And your apartment neighbors get annoyed. Just sayin'.


Whole Wheat Pita Bread
(inspired by Kitchen Meditation and Epicurious)


1 1/8 cup warm water
2 cups whole wheat flour
1 cup all purpose flour
1 tbsp canola oil
1 1/2 tsp honey
1 packet active dry yeast


Proof the yeast in the warm water and honey for 10 minutes, until it is foamy. If the yeast doesn't froth, throw out and start over. Add the oil and both types of flour, and knead on low or by hand for 10 minutes (if kneading by hand, add a little flour as you are working the dough to keep it from becoming sticky). Stop kneading when the dough is elastic and smooth.


Put the dough in a large oiled bowl and cover with a clean towel (not terry cloth). Let stand in a warm place until it has doubled in size, about 90 minutes.


Prepare baking sheets with a light dusting of cornmeal. Punch dough down, and divide into 8 equal pieces. On a lightly floured surface, work the first piece with your hands so that it forms something resembling a circle. With a floured rolling pin, roll out the piece of dough until it is approximately 6 inches in diameter and of equal thickness. Place onto a prepared baking sheet. Continue with the remaining 7 pieces of dough.


Cover with clean towels and let stand for 30 minutes.


Preheat oven to 500 F (260 C). Put one oven rack in the lower third of the oven, and remove all other racks. Working in batches (I did two batches of 3, and one of 2), transfer pitas into the oven. Cook for 2 minutes on one side, flip with a pair of tongs, and cook for 1 minute on the other side. Immediately put into a brown paper bag until cooled.


(I was not making these for pita pockets, but for those of you who are interested... Some of my pitas formed pockets and some did not. I would say that I had a 50% success rate. It seemed that the ones I left in a minute longer puffed up better.)


Serve with home-made hummus (I posted recipes here)! Or fold up and enjoy with gyro-style sandwich toppings.


Sunday, March 20, 2011

Sun-Dried Tomato Hummus and Roasted Red Pepper Hummus

Today started out bright, sunny, and warm. It was a nice little preview of spring, and it got me in a spring cleaning mode. I didn't sit down from 9:30am - 6:30pm, and I feel that I really accomplished a lot today.


One of the things I did was to try out a few hummus recipes and whole wheat pitas. I was unable to find tahini, and I am not able to eat lemon, so the hummus is not entirely authentic... But they taste great anyway!


Sun-Dried Tomato Hummus

1 (15 oz) can of garbanzo beans, drained
6-8 oil-packed sun-dried tomatoes
1-3 cloves garlic, minced (depending on preference)
3 basil leaves, finely chopped
1-4 tbsp olive oil
Salt and pepper to taste


Follow directions below.


Roasted Red Pepper Hummus
(inspired by Back to Her Roots)

1 (15 oz) can garbanzo beans
2-3 roasted red peppers (fresh, or jarred and oil-packed)
1-3 garlic cloves, mined (depending on preference)
1 handful fresh parsley (approx 3 tbsp)
1-4 tbsp olive oil
1/4 tsp cayenne pepper (optional)
Salt and pepper to taste


Follow the directions below.


Put all of the ingredients but the olive oil, salt and pepper into a food processor. Mix until smooth, adding the olive oil while mixing until the desired consistency is reached. Taste and add salt and pepper as needed.


Tips:

Peel the garbanzo beans for smoother hummus. To do this, pinch a bean between your fingers. The skin should pop right off.

For better taste, substitute 1 tbsp of the oil the tomatoes or peppers came packed in for 1 tbsp of olive oil.


Monday, February 28, 2011

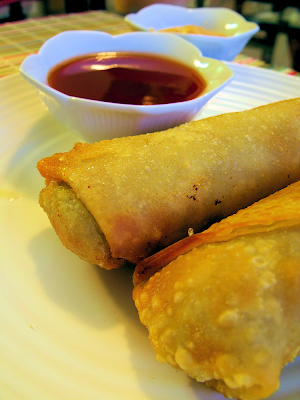
Restaurant-Style Egg Rolls (And How to Roll Them)


I don't think that I am exaggerating when I say that I learned a couple of important life lessons when making these AMAZING egg rolls from Babble.com.


These lessons are as follows:


1 - Egg rolls are not intimidating. They are seriously simple to make.


2 - Having to roll tissue paper around glass vials at work is a skill that apparently pays off in spades when it comes to egg rolls.


3 - If you have never tried cooking with fresh ginger (I hadn't before this), do it. Now. Just so you have an excuse to smell it. Ginger smells so fresh and tangy, it almost reminds me of lemon. I am ashamed of myself for ignoring it in all of those smoothie recipes I have tried over the past few years. Plus, I can't have lemon, so ginger has earned bonus points with me!


4 - Get a helper when you make these. Throw a party even. It's more fun and takes less time!


Also, there are apparently there are no illustrated / photographic egg roll rolling guides online. At least not that I could find. So I made one. :) I've got you covered on this egg roll business.


Restaurant-Style Egg Rolls
(original recipe found here)

1 lb ground pork, beef, or turkey (I used turkey)
4 cups finely shredded cabbage
2 cups matchstick cut carrots
1 – 8 oz package bean sprouts
6 green onions, chopped
1 clove garlic, chopped fine
2 tablespoons freshly chopped cilantro
1 teaspoon freshly grated ginger
1 tablespoon oyster sauce
1 tablespoon Hoisin sauce
20 egg roll wrappers
olive oil

flour and water for rolling egg rolls
vegetable oil for frying


Pull out your egg rolls and set aside. This is so that they can warm up to room temperature. They roll better that way.


In a large frying pan (or a soup pot if you are like me and only have one large skillet, and need it for frying later), pour in olive oil and brown the ground meat. Add carrots, cabbage, sprouts, onion, and garlic and cook until the cabbage starts to soften (about 10 minutes). Add ginger, cilantro, Hoisin sauce, and oyster sauce and cook until cabbage has completely softened.


Transfer to a large bowl and spread out to cool. The fanning technique used for sushi rice really helps if you want it to cool faster!


To make egg rolls, first dust a egg roll wrapper very lightly with flour on both sides. This is important and do not try to skip it! I see you trying to cut corners over there... I know it is time consuming, but this keeps the egg rolls from becoming overly wet, getting sticky, and /or breaking open. Trust me. I am talking from experience.


Follow the following steps:


1 - Put your lightly dusted egg roll wrapper on a plate. Fill with approximately 2 tbsp of cooled filling. Place the filling just slightly below the middle of the wrapper as pictured.


2 - Roll the bottom up. I found it helpful to lightly wet the bottom corner with just a dab of water, and to stick it to the wrapper while using my other hand to form the round shape of the egg roll. Don't worry about the ends on this step.


3 - Stuff any fallen filling back into the ends of the egg roll. Lightly wet the two outside corners. Pull one in and tightly it fold on top of the egg roll, sticking the corner to the wrapper. Do the same with the second side. Your egg roll should now resemble an open envelope.


4 - Roll the egg roll from the bottom up, stopping when the last bit of the top flap is left exposed. Make sure to roll tightly.


5 - Wet the entire two sides left exposed, in order to ensure a tight seal. Don't want these popping open in the skillet!


6- Roll it up and press lightly to seal! You're done. :) Wasn't that easy?


Preheat a large skillet or deep fryer filled with oil to approximately 350°F (180°C). If using a skillet, you can tell that the water is hot if you take a small about of room temperature water and flick it onto the oil. The oil should pop and sizzle when ready. (My skillet was only around 275°F (135° C) and these fried brilliantly!) Put a few egg rolls in the oil and cook for approximately 2 minutes per side. This will vary depending on your cooking method and oil temperature.


If any of your egg rolls get holes and filling starts to fall out, pull a bit of the surrounding dough to try and cover as much of the hole as possible (without making it worse elsewhere). Put that side of the egg roll in first. This should seal it back up!


Turn often with metal tongs so that all sides get cooked, and the bottom doesn't stick. Take them out when they are golden brown and crispy. Press with paper towels to drain off the oil.


Serve with a variety of sauces, or a side of fried rice. My favorite sauces are hot mustard and sweet and sour sauce!