Monday, February 28, 2011

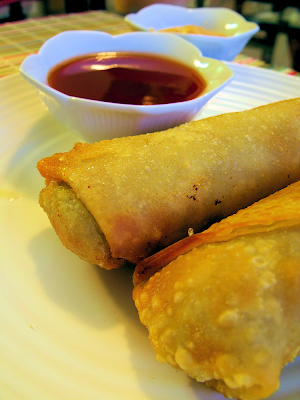
Restaurant-Style Egg Rolls (And How to Roll Them)


I don't think that I am exaggerating when I say that I learned a couple of important life lessons when making these AMAZING egg rolls from Babble.com.


These lessons are as follows:


1 - Egg rolls are not intimidating. They are seriously simple to make.


2 - Having to roll tissue paper around glass vials at work is a skill that apparently pays off in spades when it comes to egg rolls.


3 - If you have never tried cooking with fresh ginger (I hadn't before this), do it. Now. Just so you have an excuse to smell it. Ginger smells so fresh and tangy, it almost reminds me of lemon. I am ashamed of myself for ignoring it in all of those smoothie recipes I have tried over the past few years. Plus, I can't have lemon, so ginger has earned bonus points with me!


4 - Get a helper when you make these. Throw a party even. It's more fun and takes less time!


Also, there are apparently there are no illustrated / photographic egg roll rolling guides online. At least not that I could find. So I made one. :) I've got you covered on this egg roll business.


Restaurant-Style Egg Rolls
(original recipe found here)

1 lb ground pork, beef, or turkey (I used turkey)
4 cups finely shredded cabbage
2 cups matchstick cut carrots
1 – 8 oz package bean sprouts
6 green onions, chopped
1 clove garlic, chopped fine
2 tablespoons freshly chopped cilantro
1 teaspoon freshly grated ginger
1 tablespoon oyster sauce
1 tablespoon Hoisin sauce
20 egg roll wrappers
olive oil

flour and water for rolling egg rolls
vegetable oil for frying


Pull out your egg rolls and set aside. This is so that they can warm up to room temperature. They roll better that way.


In a large frying pan (or a soup pot if you are like me and only have one large skillet, and need it for frying later), pour in olive oil and brown the ground meat. Add carrots, cabbage, sprouts, onion, and garlic and cook until the cabbage starts to soften (about 10 minutes). Add ginger, cilantro, Hoisin sauce, and oyster sauce and cook until cabbage has completely softened.


Transfer to a large bowl and spread out to cool. The fanning technique used for sushi rice really helps if you want it to cool faster!


To make egg rolls, first dust a egg roll wrapper very lightly with flour on both sides. This is important and do not try to skip it! I see you trying to cut corners over there... I know it is time consuming, but this keeps the egg rolls from becoming overly wet, getting sticky, and /or breaking open. Trust me. I am talking from experience.


Follow the following steps:


1 - Put your lightly dusted egg roll wrapper on a plate. Fill with approximately 2 tbsp of cooled filling. Place the filling just slightly below the middle of the wrapper as pictured.


2 - Roll the bottom up. I found it helpful to lightly wet the bottom corner with just a dab of water, and to stick it to the wrapper while using my other hand to form the round shape of the egg roll. Don't worry about the ends on this step.


3 - Stuff any fallen filling back into the ends of the egg roll. Lightly wet the two outside corners. Pull one in and tightly it fold on top of the egg roll, sticking the corner to the wrapper. Do the same with the second side. Your egg roll should now resemble an open envelope.


4 - Roll the egg roll from the bottom up, stopping when the last bit of the top flap is left exposed. Make sure to roll tightly.


5 - Wet the entire two sides left exposed, in order to ensure a tight seal. Don't want these popping open in the skillet!


6- Roll it up and press lightly to seal! You're done. :) Wasn't that easy?


Preheat a large skillet or deep fryer filled with oil to approximately 350°F (180°C). If using a skillet, you can tell that the water is hot if you take a small about of room temperature water and flick it onto the oil. The oil should pop and sizzle when ready. (My skillet was only around 275°F (135° C) and these fried brilliantly!) Put a few egg rolls in the oil and cook for approximately 2 minutes per side. This will vary depending on your cooking method and oil temperature.


If any of your egg rolls get holes and filling starts to fall out, pull a bit of the surrounding dough to try and cover as much of the hole as possible (without making it worse elsewhere). Put that side of the egg roll in first. This should seal it back up!


Turn often with metal tongs so that all sides get cooked, and the bottom doesn't stick. Take them out when they are golden brown and crispy. Press with paper towels to drain off the oil.


Serve with a variety of sauces, or a side of fried rice. My favorite sauces are hot mustard and sweet and sour sauce!


Saturday, February 26, 2011

Roasted Red Pepper Pizza Sauce


Roasted Red Pepper Pizza Sauce
(adapted from Vegetarian Times)


1 cup jarred roasted red peppers, drained
(OR use 2 fresh red peppers, cut in half and roasted on a grill)
6 oil-packed sun-dried tomatoes, drained (retain 1 tbsp of oil)
1 clove garlic, finely chopped
1 teaspoon dried oregano
1 teaspoon dried basil
1/4 teaspoon freshly ground black pepper
1 tablespoon water


In a food processor or blender, puree red peppers, tomatoes, oil, garlic, and water. Add more water by the teaspoon until you reach your desired sauce thickness. Add in oregano, basil, and black pepper; blend until well-mixed. Makes about 2 cups.


Use for homemade pizza! I used a pre-made crust here. I plan on posting a pizza dough recipe someday.


Tuesday, February 22, 2011

Root Vegetable Fries with Gremolata


Do you know someone who hates sweet potatoes? I did. His name is Keith and he was an avid sweet potato hater when he woke up yesterday morning.


This recipe changed that.


I started making this knowing that he hates them. And not understanding why. They are exactly as they are described: sweet potatoes. Sweet. Potatoes. Potatoes that are sweet. What's not to love?!


He thought they were carrots, and the first thing he bit into when he was picking at the cooling french fries was a sweet potato. The reaction?


"Oh my god, what did I just eat? MARY! IS THIS A SWEET POTATO?!"
"Yes. What do you think?"
".... I like it. But don't get any ideas!"


Well. It's too late for that now!


Root Vegetable Fries with Gremolata
(from Yoga Journal)

2 lbs of root veggies of your choice
(ideas: potatoes, sweet potatoes, carrots, rutabagas parsnips, yams)
4 tablespoons olive oil
2 tablespoons fresh sage ( OR 1 teaspoon dried)
Salt to taste


Gremolata

2 tablespoons parsley
2 garlic cloves
1 teaspoon lemon zest


Preheat oven to 400°F (205°C).


Peel all of the vegetables and cut into fry-sized pieces. I used one half of each of the following: sweet potato, parsnip, rutabaga. I also used one large red potato and one large carrot (not peeled).


Put all of your fries into a large bowl. Add olive oil, sage, and salt; mix until the fries are coated evenly. Go easy on the salt - the herbs and garlic are so strong that these fries have great flavor without much salt! And you can always add some later, if you want to.


Spread the fries on a large cookie sheet for baking. Cook for 20 minutes, stir, and cook for about 20 more (for a total of about 40 minutes; mine took 45-50, but my oven is lame). The fries should be crispy on the outside and soft on the inside.


While the fries are cooking, mix the parsley, lemon zest, and garlic to make gremolata. When fries are finished, toss with the gremolata mix and serve. No need for ketchup on these fries! They taste too good for that.


(I did not use lemon zest and this recipe was still amazing. I am trying to find information on whether lemon zest contains citric acid - I do not think it does from what I have found so far, but I would rather not chance it!)


Monday, February 21, 2011

Apple Pancake Cookies


One of my goals this year is to eat local, seasonal produce as often as possible. I have been doing my research and have found only two farmer's markets nearby that are open in winter. (The rest of the markets open in May and June.) One is about 20 miles away, and the other is about 30. Though in the grand scheme of things, 20 miles is better than 200,000 miles!


I think why I am stalling on going to the closer one is that I have never been to a farmer's market before, and I am not familiar with the U-District in Seattle. I will have to see if I can find someone to tag along with me, and make a day of it!


Now, on to more serious matters: these cookies are truly amazing. They are light and moist, with a wonderful strong walnut flavor and big apple chunks. To me, they taste like eating little apple cinnamon pancakes (hence the name).


Apple Pancake Cookies
(adapted from The Golden Book of Cookies)

2 cups flour
1/2 teaspoon baking powder
1/2 teaspoon baking soda
1/2 teaspoon ground cinnamon
1/4 teaspoon salt
1/2 cup butter, softened
1/2 cup granulated sugar
1/2 cup brown sugar
1 large egg
1 cup applesauce
1 Granny Smith (or other tart) apple
1 cup finely chopped walnuts


Preheat your oven to 375°F (170°C) and grease two cookie sheets.


Cream the butter and the sugars in a large bowl. Beat in the applesauce and egg until just mixed, being sure not to over mix. Slowly mix in the flour, baking powder, baking soda, cinnamon, and salt until well smooth.


Finely chop up the walnuts. I usually do this with a hand chopper - I do not use it often, but with nuts it is a real time saver. Peel and core the apple, chopping it up into small chunks. The size of the apple pieces is really up to you.


Add the apple and walnut pieces to the cookie mix.


Using two spoons, drop small balls (2-3 tablespoons) of dough onto the pre-greased cookie sheets, about 2 inches apart. Cook for 15-20 minutes. Check on the cookies at 15 minutes to make sure that the bottoms aren't getting too dark.


Serve with milk! Keith also suggested that a drizzle of caramel would taste great on top of these.


Wednesday, February 16, 2011

Spiced Shredded Beef Sandwiches


I am in love with my crock-pot.


It was purchased months ago and sat in the back of my cupboard, forgotten, until winter came along. Now? It is out at least once every two weeks, producing stews, chilis, and pot roast.


I can comfortably admit that meat and I do not mix well. I always seem to have made it too dry, overspiced, undercooked, burnt, or half-frozen. Not that I mind. Give me a fresh summer veggie pasta dish over a grilled steak any day.


Needless to say, the crock-pot saved Keith from a life of meatless meals.


Spiced Shredded Beef Sandwiches

(inspired by Family Circle magazine)

1 cup beef broth (low sodium)
1 jar (8 oz) hoisin sauce
1/4 cup white vinegar
2 teaspoons Chinese five-spice powder
2 teaspoons garlic powder
2 teaspoons chili powder (optional)
2 ribs celery
2 large carrots
1 thin-cut beef brisket or chuck roast (2 lbs)
1/4 teaspoon salt
1/2 teaspoon black pepper
1 head bok choy


Whisk beef broth, hoisin sauce, vinegar, five-spice powder, and garlic powder with 1/2 cup water in a small bowl. Add optional chili powder for a bit of extra kick - Keith and I both thought that this recipe could have used a bit more flavor.


Cut the carrots and celery into 2 inch long matchsticks, and line the bottom of the crock-pot with them. Add the beef brisket/roast - cut in half if you need to make it fit better. Do not cut it in more than two pieces, or you will be angry with yourself when you are fishing them out later.


Season the meat with salt and pepper and pour the beef broth sauce over the top of everything.


Cover and cook on low for 10 hours or high for 5. Always choose the low setting if at all possible - it makes the meat softer and more flavorful.


Walk away and enjoy your next 10 hours of freedom!


When the time is up, remove the meat and allow it to sit and cool on a plate or cutting board. Skim any fat off the top of the beef sauce and throw it out.


While the meat is cooling, slice up the bok choy into small, thin strips. Add the entire head to the crock-pot, cover, and cook on high for 10 minutes.


Shred the beef up with two forks while you wait for the rest of the mix to cook. Cut any long pieces up into bite-sized chunks. Scoop the meat back into the crock-pot and stir to mix everything back together. Cook for 5 more minutes.


Serve on buns, with a side of salad!


(I suggest small buns with small scoops for those watching calories. The magazine article claims that 1 serving has 479 calories - keeping in mind that they say this is only 8 servings.)


Wednesday, February 9, 2011

Sweethearts


Normally I would not make heart-shaped cookies for Valentine's Day.


I have never been a big Valentine's Day person. I have a lot of reasons for this, and I could rant about consumerism, media overload, and the American Dream for ages - but I won't. I think you should express love every day, not just on one day in February.


But these cookies caused me to have a moment of Valentine's Day joy.


For Christmas I got "The Golden Book of Cookies" from Keith. He joked it was actually a Christmas present for himself, that would pay him back all year long, because of my weakness for baked goods.


He knows me too well.


I have been waiting to make these since I saw the recipe on Christmas Day, and they were well worth the wait. Even if they are Valentine's themed!


Sweethearts
(adapted from The Golden Book of Cookies)

2 1/4 cups flour
1 1/2 teaspoons baking powder
1/2 teaspoon ground cinnamon
1/4 teaspoon salt
3/4 cup butter, softened
1/2 cup sugar
1/2 cup dark brown sugar, firmly packed
1 large egg
1/2 teaspoon vanilla extract
Finely grated zest of one lemon*
(*I did not add this, and they still tasted great!)


Topping

1 cup frozen raspberries
1/4 cup granulated sugar
3/4 cup strawberry preserves
1 cup powdered sugar, for dusting


Cream the butter and both sugars in a large bowl until smooth. Add egg, vanilla, and lemon zest. Blend until smooth.


In the same bowl, mix in the flour, baking powder, cinnamon and salt. Your dough may be crumbly - this is okay. Press the dough together with your hands into a disc shape. Cover with plastic wrap and refrigerate for 30 minutes.


Preheat oven to 350°F (180°C) and grease two cookie sheets. Allow the dough to sit at room temperature for about 5 minutes. Roll out 1/3rd of the dough onto a lightly floured surface. (I found the dough difficult to work with at first. If you have this problem, work the dough with your hands until it is easier to roll out.)


Use a heart-shaped cookie cutter to cut out cookies. Transfer to the cookie sheets with a spatula, placing them 1/2 inch apart. Re-roll the scraps and continue until you run out of dough.


Bake cookies until golden brown (8-10 minutes). Let them cool on the baking sheets for about 3 minutes (they will break if you move them too soon - trust me), then transfer to cooling racks.


While the cookies are cooling, process the raspberries, sugar, and strawberry preserves in a blender (or food processor) until smooth. If you do not want the raspberry seeds in your topping, pour the mixture through a mesh strainer. Put the mix into a pot and simmer over medium heat for about ten minutes, until you have approximately 1 cup of topping.


Remove the pot from heat and let the mix cool for 15 minutes, stirring occasionally. With a small metal spatula or butter knife, spread the topping on the cookies. Let the cookies sit until the topping solidifies - I let mine sit out overnight. Dust with powdered sugar.


Share the love: give these to your special someones for Valentine's Day! (Or else you'll probably end up eating them all by yourself.)


Wednesday, February 2, 2011

A Crash Course in Sushi


I have been in love with Japanese culture and (especially) Japanese food since I was 12. This has been a ten year long love affair with food that began back when I lived on an island in Alaska.


In high school and college even I flirted with the idea of majoring in Japanese language, but after 4 years of schooling decided that it was not my calling. Despite this fact, the culture will always have a special place in my heart. Sushi has always been toward the top of my list of favorite Japanese foods, but to be honest....


It has always intimidated me.


Rice is one of the most important parts of Japanese culture - so important that the word for "rice" (gohan) also means "meal" (for example: asagohan is a combination of "morning" and "breakfast"). That isn't something that you slap together willy-nilly and hope for the best! And then there are so many different kinds of rolls, and where do you find the ingredients, and...


Needless to say, I have been putting this off for a few years. I understand if you are scared. But you know what I found out? It's very, very easy to make a simple sushi roll. In this case, we are making California rolls.


This recipe will produce approximately 24 large or 32 small sushi rolls.


Special tools you will need: a bamboo rolling mat, a wooden paddle, and an extremely sharp knife (you can get all of the above here, plus a box to put them in!).

Ingredients: nori (seaweed), short-grained sushi rice, avocado, cucumber, and imitation crab sticks (surimi), white rice vinegar.

You must use sushi grade rice and prepare it correctly. This ensures that the rice is sticky and your roll holds together. Use the guide here for instructions on rice preparation, but cut the vinegar mix in half, as follows:


2 cups rice
1 1/2 tablespoons white rice vinegar
1 tablespoon granulated sugar
1/2 teaspoon salt


While you are preparing the rice, cut up your vegetables. Aim for matchstick-sized pieces that are 2 inches long. Get your nori ready by putting it on your bamboo mat, with the rough side facing up.

When you are done preparing the rice, put it in a large bowl made of any material but metal (it will make the rice taste funny). Wood is preferred, but I used plastic and had no problems. Allow rice to cool (fanning the rice will make it cool much faster).


Wet your hands entirely with cool water to prevent the rice from sticking. It is important that your hands aren't dripping wet - you want the nori to remain as dry as possible. Using your hands, place an even layer of rice on the sheet of nori, leaving about an inch of space on one end to seal the "maki" (the full roll before being cut) after you roll it up.

On the opposite end from the inch of space you left, place your ingredients. For a California roll you would use surimi (crab sticks), cucumber, and avocado. Keith ate all of the cucumbers without my knowledge, so I improvised here. Don't be afraid to put on more ingredients than you see above... My rolls needed more goodies in the middle!


Starting at the end with the fillings, start rolling your maki. Make a tight rectangular shape with the mat, making sure to keep everything tight by putting pressure on all three sides at the same time. Your maki should have a square shape when you are all finished.


Wet your extremely sharp knife with luke warm water. Your knife must be sharp for this to work properly. The warm water keeps the nori and rice from sticking. Make sure to re-wet the knife from time to time while you are cutting.


Start by cutting your maki roll in half. From there, cut each half into three or four pieces. This will give you six large or eight small rolls per maki roll. Continue to make maki rolls until you run out of rice (this recipe should make 4 maki rolls).


Enjoy with some soy sauce or wasabi!